Search This Blog

Thursday, 7 July 2011

Quantity Box in the Category Products Listing Page

Your Magento product ordering might seem a long process to some business owners, so we thought of making it simple, so that users can directly enter the quantity in the products listing area and click on ADD TO CART and checkout.

So, here is how you can do that.

Goto /app/design/frontend/default/your-theme/template/catalog/product/list.phtml

Open the file on a code editor and find this line,

<button type="button" title="<?php echo $this->__('Add to Cart') ?>" onclick="setLocation('<?php echo $this->getAddToCartUrl($_product) ?>')"><span><span><?php echo $this->__('Add to Cart') ?></span></span></button>

Just replace it with,

<form action="<?php echo $this->getAddToCartUrl($_product) ?>" method="post" id="product_addtocart_form_<?php echo $_product->getId()?>"<?php if($_product->getOptions()): ?> enctype="multipart/form-data"<?php endif; ?>>
 <?php if(!$_product->isGrouped()): ?>
 <label for="qty"><?php echo $this->__('Qty') ?>:</label>
 <input type="text" name="qty" id="qty" maxlength="12" value="<?php echo ($this->getMinimalQty($_product)?$this->getMinimalQty($_product):1) ?>" />
 <?php endif; ?>
 <button type="button" onclick="this.form.submit()"><span><span><span><?php echo $this->__('Add to Cart') ?></span></span></span></button>
 </form>

You are done! If you want to style the quantity box, you can add class css to it.

Wednesday, 29 June 2011

Guest chat feature in Google Talk

Yesterday I found a new feature introduced by Google to enable Guests on your website or blog to chat with you.

New! Chatback

Let visitors to your site chat with you


I think its really cool. The guests won't know your Googletalk or your Gmail ID but they can still ping you if you are online.

You can also customize the title and toggle the display of online status message. When they ping you you will get a guest chat window in Gtalk. If you are using Pidgin, you will get a link for a chat window.

Wednesday, 25 May 2011

Redirecting www to non-www Using .htaccess

The Apache Web server supports URL rewriting with the mod_rewrite engine. Placing custom rules in an .htaccess file lets you do all sorts of useful things to keep your URLs tidy. One really handy thing you can do for search engines and visitors is redirecting traffic from www to non-www version of your domain (and vice versa).


Some people prefer to use www.somesite.com, but some people prefer the shorter somesite.com. There isn't really a right or wrong way to do it, but whatever you choose you can make sure all of your visitors get sent to the same place. With a few simple rules on the server you can choose from non-www to www, or redirecting from www to non-www.

If you already have a file named .htaccess on your Website you can add to it. If not, create one (yes, include the period at the beginning). Add either of the following rules and save. Replace yourdomain.com with your actual domain name.

Redirect www to non-www:
RewriteEngine On
RewriteBase /
RewriteCond %{HTTP_HOST} ^www.yourdomain.com [NC]
RewriteRule ^(.*)$ http://yourdomain.com/$1 [L,R=301]
 
Redirect non-www to www:
RewriteEngine On
RewriteBase /
RewriteCond %{HTTP_HOST} ^yourdomain.com [NC]
RewriteRule ^(.*)$ http://www.yourdomain.com/$1 [L,R=301]
 
Both of these rules send a full search engine friendly 301 HTTP  redirect. They also preserve the entire URL (so yoursite.com/about  redirects to www.yoursite.com/about).

Search engines can usually figure out which format is preferred, but since you're showing the same page for www and non-www URLs it can't hurt to be consistent about it.

Create your .htaccess rewrite code:
Use our www Redirect Generator tool to automatically generate the required redirect code.

Wednesday, 18 May 2011

Jquery image zooming plug-in really this is an extraordinary and compatible with all browsers.

JQZoom is a javascript image magnifier built at the top of the popular jQuery javascript framework. jQzoom is a great and a really easy to use script to magnify what you want.
Works on all modern browsers:

http://www.mind-projects.it/projects/jqzoom/demos.php


Tuesday, 10 May 2011

Send test emails with WampServer

I have been tried set up email sending option from WampServer for windows finally found following And seems to be very useful. However i modified this according to my needs.

What you will need:

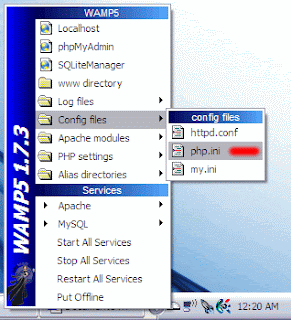
Go ahead and install WampServer. I just installed mine to the root of the c: drive so it makes for easy access (For example, “c:\wamp”).
Next download Fake Sendmail. Fake Sendmail, aka sendmail.exe, is a simple windows console application that emulates sendmail’s “-t” option to deliver emails. Extract the sendmail.zip file and move the folder here: “c:\wamp\sendmail”.
We need the Gmail email account because sendmail.exe requires an smtp server to perform the actual delivery of the messages. Now let’s configure some settings in the sendmail.ini file located here: “c:\wamp\sendmail”.
  • line 14 | smtp_server=smtpout.secureserver.net
  • line 18 | smtp_port=80
  • line 38 | auth_username=youremail@goeshere.com
  • line 39 | auth_password=yourpasswordgoeshere

For Gmail Account:
  • line 14 | smtp_server=smtp.gmail.com
  • line 18 | smtp_port=465
  • line 38 | auth_username=youremail@gmail.com
  • line 39 | auth_password=yourpasswordgoeshere
There are a few lines that need to be commented out/uncommented accordingly. Then save and close the sendmail.ini file.
Only one step left and that’s to make a change in the php.ini. Access the php.ini using this method below.


Search for sendmail_path and set it to “c:\wamp\sendmail\sendmail.exe –t”.

Save and close the php.ini file.
You must restart WampServer for the changes to the php.ini to take effect.
Having the ability to send test emails is great especially if you frequently work on scripts that require email generation. At least I think so (I’m smiling).