Monday 31 December 2012
Thursday 27 December 2012
Friday 14 December 2012
Add column to Magento admin products / orders grid
Add column to Magento admin products grid:
http://stackoverflow.com/questions/5990910/add-column-to-magento-admin-catolog-manage-products?answertab=active#tab-top
Extending Sales Order grid:
http://inchoo.net/ecommerce/magento/how-to-extend-magento-order-grid/
Add custom renderer for a custom column in Magento grid:
http://inchoo.net/ecommerce/magento/how-to-add-custom-renderer-for-a-custom-column-in-magento-grid/
Wednesday 12 December 2012
Integrating with Facebook with Wordpress
1. Install the APP in Facebook http://apps.facebook.com/rssgraffiti/
a. This will just push the post to Face Book
2. Create an application in Facebook https://developers.facebook.com/blog/post/2012/06/12/facebook-integration-for-wordpress/ and Install the WP Extension http://wordpress.org/extend/plugins/facebook/
a. Like, Send, Subscribe buttons
b. WP Widgets for following:
i. Recommendations
ii. Recent Activity
iii. Like, Send, and Subscribe buttons.
c. Short codes for Like and Send buttons
Force URLs to lowercase with Apache rewrite and PHP
Force URLs to lowercase with Apache rewrite and PHP:
#### Add following code to HTaccess ###########
RewriteEngine on
RewriteBase /
# force url to lowercase if upper case is found
RewriteCond %{REQUEST_URI} [A-Z]
# Exclude images being redirected
RewriteCond %{REQUEST_URI} !(\.jpg|\.png|\.gif|\.css|\.jpeg|\.js|\.bmp|\.swf)$ [NC]
# ensure it is not a file on the drive first
RewriteCond %{REQUEST_FILENAME} !-s
RewriteRule (.*) rewrite-strtolower.php?rewrite-strtolower-url=$1 [QSA,L]
######## Create PHP file with name rewrite-strtolower.php and add the followinf code into that file. Place this php file smae folder as htaccess
if(isset($_GET['rewrite-strtolower-url'])) {
$url = $_GET['rewrite-strtolower-url'];
unset($_GET['rewrite-strtolower-url']);
$params = http_build_query($_GET);
if(strlen($params)) {
$params = '?' . $params;
}
header('Location: http://' . $_SERVER['HTTP_HOST'] . '/' . strtolower($url) . $params, true, 301);
exit;
}
header("HTTP/1.0 404 Not Found");
die('Unable to convert the URL to lowercase. You must supply a URL to work upon.');
Monday 10 December 2012
Adding upload field in contact form and send as attachment
Adding upload field in contact form and send as attachment
http://www.blog.magepsycho.com/adding-upload-field-in-contact-form-and-send-as-attachment/
Create Dynamic CMS Navigation For Magento Frontend
http://www.blog.magepsycho.com/create-dynamic-cms-navigation-for-magento-frontend/
Merging registration form with default login page of magento (creating mini registration form)
http://www.blog.magepsycho.com/merging-registration-form-with-default-login-page-of-magento-creating-mini-registration-form/
Disable Local Modules:
Even you disable all the local modules using following code in app/etc/local.xml:
<disable_local_modules>true</disable_local_modules>
or
using following code in app/etc/modules/*.xml
<active>false</active>
How to check if customer is already logged in from another location?
http://www.blog.magepsycho.com/how-to-check-if-customer-is-already-logged-in-from-another-location/
Configuring Magento for Development / Debug Mode
http://www.blog.magepsycho.com/configuring-magento-for-development-debug-mode/
How to use WYSIWYG editor (TinyMCE) in custom Admin Magento Module
http://www.blog.magepsycho.com/how-to-use-wysiwyg-editor-tinymce-in-custom-admin-magento-module/
Updating product qty in Magento in an easier & faster way
http://www.blog.magepsycho.com/updating-product-qty-in-magento-in-an-easier-faster-way/
Using Magento header / footer outside of Magento
http://www.blog.magepsycho.com/using-magento-header-footer-outside-of-magento/
Usage of <can_be_empty> tag for system configuration multi-select field
http://www.blog.magepsycho.com/usage-of-can_be_empty-tag-for-system-configuration-multi-select-field/
Sunday 9 December 2012
Adding a mass action to Magento Grid
http://www.blog.magepsycho.com/adding-new-mass-action-to-admin-grid-in-magento/
Adding a new button on order view page:
http://stackoverflow.com/questions/10691895/magento-add-button-to-sales-order-view-page-observer-event
Add a comments field to checkout page for the order:
http://www.magecorner.com/magento-order-comments/
Adding custom system config xml in Magento:
http://www.ecomdev.org/2010/10/27/custom-configuration-fields-in-magento.html
Adding a button to system configuration:
http://www.atwix.com/magento/add-button-to-system-configuration/
DB queries profiler:
Magento provides an ability for developers to track database queries. For this purpose you should use a built in DB resource profiler. It can help you to inspect database queries, detect the longest query, detect the slowest query, etc.. Here is a small example on how to use a DB profiler for your own needs :
$profiler = Mage::getSingleton('core/resource')->getConnection('core_write')->getProfiler();
foreach ($profiler->getQueryProfiles() as $query) {
    $queryTime[] = $query->getElapsedSecs(); // Get the query execution time
    $queryRaw[] = $query->getQuery(); // Get the query text
}
|
Thursday 6 December 2012
Frequently used Putty commands
Database Dump:
mysqldump -u username -h localhost -p dbname > filename.sql
Import Database Dump:
mysql -u username -p -h localhost DATA-BASE-NAME < data.sql
Tar a folder:
tar -cv foldername > foldername.tar
GZip the tar file:
gzip foldername.tar
Extract tar.gz file:
tar -zxvf yourfile.tar.gz
Extract .bz2 file:
bunzip2 yourfile.bz2
Extract tar.bz2file:
tar jxf backup.tar.bz2
Copy files from source to destination:
scp local.xml username@hostnameORipaddress:FullFolderTargetPath
All the above commands require password.
Issues with MySql Dump:
mysqldump: Got error: 1016: Can’t open file: … (errno: 24) when using LOCK TABLES
Check and change the file permissions:
mysqldump: Got error: 1016:
http://voidweb.com/2011/05/mysqldump-got-error-1016-cant-open-file-errno-24-when-using-lock-tables/
Linux remove entire directory including all files and sub-directories command
To remove all directories and subdirectories use rm command. For example remove *.doc files and all subdirectories and files inside letters directory, type the following command (warning all files including subdirectories will be deleted permanently):
$ rm -rf letters/
Where,
-r : Attempt to remove the file hierarchy rooted in each file argument i.e. recursively remove subdirectories and files from the specified directory.
-f : Attempt to remove the files without prompting for confirmation, regardless of the file's permissions
Copy files and folders from one directory to another:
http://www.cyberciti.biz/faq/copy-folder-linux-command-line/
Wednesday 5 December 2012
Tuesday 4 December 2012
PHP: Find secure connection
<?php
$secure_connection = false;
if (!empty($_SERVER['HTTPS']) && $_SERVER['HTTPS'] !== 'off'
|| $_SERVER['SERVER_PORT'] == 443) {
$secure_connection = true;
}
?>
<?php if($secure_connection): ?>
// Secure content goes here...
<?php else: ?>
// Unsecure content goes here...
<?php endif; ?>
$secure_connection = false;
if (!empty($_SERVER['HTTPS']) && $_SERVER['HTTPS'] !== 'off'
|| $_SERVER['SERVER_PORT'] == 443) {
$secure_connection = true;
}
?>
<?php if($secure_connection): ?>
// Secure content goes here...
<?php else: ?>
// Unsecure content goes here...
<?php endif; ?>
Friday 30 November 2012
Migrating Hubspot blog posts into Wordpress
Install Blog Exporter APP in Hubspot and export the posts in RSS feed format. Name it as hubspotfeed.xml
Then using following script convert the Hubspot RSS feed to Wordpress compatible RSS feed. The new generated RSS file will be created as wp-supported-feed.xml in the same directory where your PHP script file resides.
<?php
$doc = new DOMDocument();
$doc->load( 'hubspotfeed.xml' );
$blog = $doc->getElementsByTagName( "item" );
$xml = new XmlWriter();
$xml->openMemory();
$xml->startDocument('1.0', 'UTF-8');
$xml->startElement('rss');
$xml->writeAttribute('version', '2.0');
$xml->writeAttribute('xmlns:excerpt', "http://wordpress.org/export/1.2/excerpt/");
$xml->writeAttribute('xmlns:content', "http://purl.org/rss/1.0/modules/content/");
$xml->writeAttribute('xmlns:wfw', "http://wellformedweb.org/CommentAPI/");
$xml->writeAttribute('xmlns:dc', "http://purl.org/dc/elements/1.1/");
$xml->writeAttribute('xmlns:wp', "http://wordpress.org/export/1.2/");
try {
$xml->startElement('channel');
$xml->writeElement('wp:wxr_version', '1.2');
foreach( $blog as $post ) {
$xml->startElement('item');
$headers = $post->getElementsByTagName( "title" );
$title = $headers->item(0)->nodeValue;
$xml->writeElement('title', $title);
//$xml->writeElement('description', "");
$dates= $post->getElementsByTagName( "description" );
$description= $dates->item(0)->nodeValue;
//$xml->writeElement('content:encoded', $description);
$find = array("<br /><br />", "<br/><br/>", "’");
$replace = array("", "<br/><br/>", "'" );
$description = str_replace($find, $replace, $description);
//$description = htmlspecialchars_decode($description);
$xml->startElement('content:encoded');
$xml->writeCData($description);
$xml->endElement();
$notes = $post->getElementsByTagName( "pubDate" );
$pubDate = $notes->item(0)->nodeValue;
$xml->writeElement('pubDate', $pubDate);
$xml->writeElement('wp:post_date', $pubDate);
$xml->writeElement('wp:post_date_gmt', $pubDate);
$links = $post->getElementsByTagName( "guid" );
$guid = $links->item(0)->nodeValue;
$xml->writeElement('guid', $guid);
$xml->writeElement('wp:comment_status', 'open');
$xml->writeElement('wp:ping_status', 'open');
$xml->writeElement('wp:status', 'publish');
$xml->writeElement('wp:post_type', 'post');
$xml->writeElement('dc:creator', 'admin');
$xml->endElement();
//break;
}
$xml->endElement();
} catch(Exception $e) {
$xml->writeElement('error', $e->getMessage());
}
$xml->endElement();
$content = $xml->outputMemory(true);
file_put_contents("wp-supported-feed.xml", $content);
?>
Login to Wordpress admin section and Navigate to "Tools => Import"
Then click on Wordpress link
Upload the wp-supported-feed.xml file and submit
Next screen select Import author: as admin in the dropdown and check the box Import Attachments and click on "Submit"
You are done all your blog posts will be imported .............
Multi store / website setup on different domains
Useful Pointers:
http://www.magentocommerce.com/knowledge-base/entry/tutorial-multi-site-multi-domain-setup
http://www.magentocommerce.com/wiki/4_-_themes_and_template_customization/navigation/multiple-website-setup#multiple_websites_on_magento_1.4_single_installation
http://www.magentocommerce.com/boards/viewthread/204802/
Thursday 29 November 2012
Wordpress multisite
Functions can be found at http://codex.wordpress.org/WPMU_Functions
Code to get any blog pages by blog id as below:
switch_to_blog( $blog_id );
$pages = get_pages($args);
foreach ( $pages as $page ) {
echo $page->post_title;
}
restore_current_blog();
Code to get all the blogs in current site:
global $wpdb;
$blogs_info = array();
$query = "SELECT * FROM {$wpdb->blogs} WHERE site_id = '{$wpdb->siteid}' AND spam = '0' AND deleted = '0' AND archived = '0' AND mature = '0' AND public = '1'";
$site_blogs = $wpdb->get_results($wpdb->prepare($query)); // get all subsite blog ids
if(count($site_blogs) > 0) {
foreach( $site_blogs AS $site_blog ) {
$details = get_blog_details($site_blog->blog_id);
}
}
Tuesday 20 November 2012
Working with date functions in Magento
The date time will be calculated based on the lacale timezone settings in administration:
$anyDate = '2012-11-21 13:00:00';
$dateTimestamp = Mage::getModel('core/date')->timestamp(strtotime($anyDate));
echo $currentDate = date('Y-m-d H:i:s', $dateTimestamp);
Click here for more details
Other PHP scripts to find the offset for the timezone
/** Script to calculate the offset seconds fro the timezone */
$timezone = new DateTimeZone("Europe/London");
$offset = $timezone->getOffset(new DateTime("now")); // Offset in seconds
echo ($offset < 0 ? '-' : '+').round($offset/3600).'00'; // prints "+1100"
/** Script to convert the date and time to specific timezone */
$value = "2012-09-21 13:00:00";
$date = new DateTime($value);
$date->setTimezone(new DateTimeZone('Europe/London'));
echo $date->format('Y-m-d H:i:s');
Monday 19 November 2012
Magento: Get current Module Name, Controller Name and Action Name
$req = Mage::app()->getRequest();
$req->getModuleName();
$req->getControllerName();
$req->getActionName();
$req->getModuleName();
$req->getControllerName();
$req->getActionName();
Thursday 8 November 2012
Magento: Display Currency Switcher in Header
Add the following XML in layout/directory.xml between <default> and </default>
<reference name="header">
<block type="directory/currency" name="top.currency" template="directory/currency.phtml"/>
</reference>
Add following code in header.phtml
<?php echo $this->getChildHtml('top.currency') ?>
<reference name="header">
<block type="directory/currency" name="top.currency" template="directory/currency.phtml"/>
</reference>
Add following code in header.phtml
<?php echo $this->getChildHtml('top.currency') ?>
Magento: Change the store currency
$store = Mage::app()->getStore();
$store->setCurrentCurrencyCode('GBP');
Note:
Make sure the currency is enabled for the specific store
Make sure the currency conversion rate has been populated and saved
$store->setCurrentCurrencyCode('GBP');
Note:
Make sure the currency is enabled for the specific store
Make sure the currency conversion rate has been populated and saved
Wednesday 7 November 2012
Magento: Very usefull and informative resources
Using A Backend Model To Customize Magento (A Tip From Magento Developers Paradise)
http://magebase.com/magento-tutorials/using-a-backend-model-to-customize-magento-a-tip-from-magento-developers-paradise/
Magento Extension Clashes – Winners and Loosers
http://magebase.com/magento-tutorials/magento-extension-clashes-winners-and-loosers/
Best Practices for Magento Development
https://docs.google.com/present/view?id=dhcwthkz_193dwp4z8cb
Tuesday 6 November 2012
Magento: Events and Observers
One of the greatest feature in Magento is Events and Observers.
You can add any functionality for the specific Event without following:
1. Modifying core files
2. Copy core file to local folder
3. Override Core files
4. Extend core methods
Here are the links for best examples:
Using events is the best way of extending Magento functionality......
You can add any functionality for the specific Event without following:
1. Modifying core files
2. Copy core file to local folder
3. Override Core files
4. Extend core methods
Here are the links for best examples:
- http://codemagento.com/2011/04/observers-and-dispatching-events/
- http://magedev.com/2009/08/11/magento-events-create-update/
- http://magedev.com/2010/10/15/adding-event-observer-on-the-fly/
Using events is the best way of extending Magento functionality......
Tuesday 30 October 2012
JQuery library for Magento
jQuery is a cross-browser JavaScript library designed to simplify the client-side scripting of HTML
http://www.magentocommerce.com/magento-connect/utilities/developer-tools/mygento-jquery-library-and-powerful-plugins.html
http://www.magentocommerce.com/magento-connect/utilities/developer-tools/mygento-jquery-library-and-powerful-plugins.html
Friday 26 October 2012
Magento Custom Admin Theme
http://inchoo.net/ecommerce/magento/custom-admin-theme-in-magento/
Just create new theme and place modified files and new files only instead of all the stuff from default theme.
Just create new theme and place modified files and new files only instead of all the stuff from default theme.
Tuesday 23 October 2012
Monday 22 October 2012
Magento: Programtically Cancel the coupon code on the shopping cart
$quote = Mage::getSingleton('checkout/session')->getQuote();
$oldCouponCode = $quote->getCouponCode();
if (strlen($oldCouponCode)) {
$quote->setCouponCode('')->collectTotals()->save();
}
$oldCouponCode = $quote->getCouponCode();
if (strlen($oldCouponCode)) {
$quote->setCouponCode('')->collectTotals()->save();
}
Friday 19 October 2012
Delete Test data from Magento
Delete Test Products from Magento:
http://www.sonassi.com/knowledge-base/magento-kb/mass-delete-products-in-magento/
Delete Test Orders from Magento:
http://inchoo.net/ecommerce/magento/delete-test-orders-in-magento/
Magento Database Diagram and tables:
http://www.magentocommerce.com/wiki/2_-_magento_concepts_and_architecture/magento_database_diagram
http://www.magereverse.com/
Delete all products:
http://www.magentocommerce.com/boards/viewthread/20553/
Tuesday 16 October 2012
Monday 15 October 2012
Image resizing and croping using PHP
Below to sample scripts i found useful to resize and crop the images using PHP. Both resources doing the samething.
http://forrst.com/posts/PHP_Resize_Crop_Image_to_Best_Fit-sel
http://net.tutsplus.com/tutorials/php/image-resizing-made-easy-with-php/
Simple PHP script to resize the images:
http://www.kavoir.com/2009/01/php-resize-image-and-store-to-file.html
Image upload and crop using JQuery and PHP:
http://www.9lessons.info/2011/06/image-upload-and-cropping-with-php-and.html
http://www.webmotionuk.co.uk/php-jquery-image-upload-and-crop/
Face detection using PHP
We need to install Facedetection, OpenCV PHPextensions to use these functions to find the coordinates of the faces. Go through the following resouces for more information.
http://corpocrat.com/2009/08/18/automatic-face-detection-with-php-in-linux/
https://github.com/infusion/PHP-Facedetect
http://www.xarg.org/project/php-facedetect/
You can detect face without any PHP extension using below Script:
http://devlup.com/programming/php/face-detection-using-php/1140/
http://www.emanueleferonato.com/2010/07/06/php-face-detection-class/
http://www.codediesel.com/algorithms/face-detection-in-images-using-php/
http://svay.com/blog/face-detection-in-pure-php-without-opencv/
Create, Design And Deliver Your Email Newsletter
How To Create, Design And Deliver Your Email Newsletter:
http://www.masternewmedia.org/how-to-create-design-and-deliver-your-email-newsletter/
Email clients and supporting designs:
http://www.email-standards.org/
http://www.masternewmedia.org/how-to-create-design-and-deliver-your-email-newsletter/
Email clients and supporting designs:
http://www.email-standards.org/
Thursday 11 October 2012
Test credit card numbers for test mode integration
Here is a list of sample/dummy/test credit card numbers, which are
safe to use when you test credit card functionality on a website or
application that involves credit card transactions. These credit card
numbers validate properly but they are not actually in use.
American Express:
378282246310005
3111111111111117
343434343434343
370000000000002
340000000000009
371449635398431
378734493671000
Visa:
4111111111111111
4007000000027
4222222222222
4012888888881881
MasterCard:
5105105105105100
5111111111111118
5454545454545454
5500000000000004
5555555555551111
5555555555554444
Discover:
6011111111111117
6011000000000004
6011000990139424
6011601160116611
6111111111111116
JQuery Video and Audio players
The jQuery HTML5 Audio / Video Library
http://www.jplayer.org/latest/demos/
http://www.jplayer.org/latest/demos/
Monday 1 October 2012
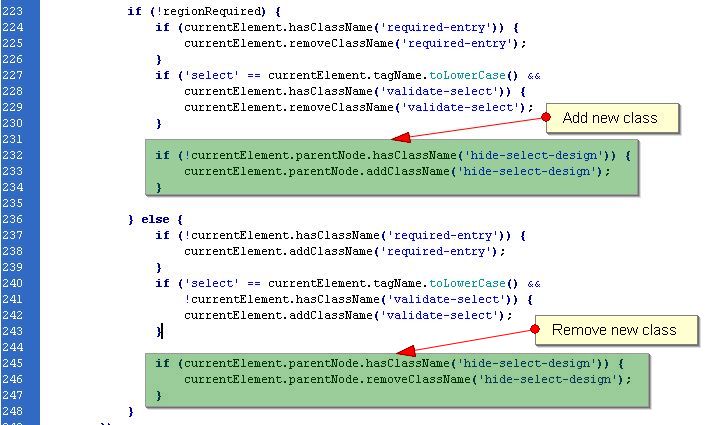
Add Remove class name to parent node based on the selected country has states or not
Add class to parent node based on the selected country has states (dropdown) or not (textbox)
Open the file js\varien\form.js and navigate to _checkRegionRequired: function()
Add the following code to add new class name to the parent tag
if (!currentElement.parentNode.hasClassName('hide-select-design')) {
currentElement.parentNode.addClassName('hide-select-design');
}
Add the following code to remove new class name from the parent tag
if (currentElement.parentNode.hasClassName('hide-select-design')) {
currentElement.parentNode.removeClassName('hide-select-design');
}
Friday 28 September 2012
Magento: Move Google Analytics code to head tag
To move the GA code from after <body> tag to before closing </head> tag involves following two steps:
Step 1:
Add the following code with in the <block type="page/html_head" name="head" as="head"> tag in app\design\frontend\base\default\layout\page.xml
<block type="core/text_list" name="before_head_end" as="before_head_end" translate="label">
<label>Page Top</label>
</block>
 Step 2:
Now open app\design\frontend\base\default\layout\googleanalytics.xml file and replace
after_body_start
With
before_head_end

Note: Make sure you enabled GA in admin section Magento: Setting Up Google Analytics + eCommerce Tracking
If the changes not reflecting then refresh the Magento cache and check.....
Step 1:
Add the following code with in the <block type="page/html_head" name="head" as="head"> tag in app\design\frontend\base\default\layout\page.xml
<block type="core/text_list" name="before_head_end" as="before_head_end" translate="label">
<label>Page Top</label>
</block>

Now open app\design\frontend\base\default\layout\googleanalytics.xml file and replace
after_body_start
With
before_head_end
Note: Make sure you enabled GA in admin section Magento: Setting Up Google Analytics + eCommerce Tracking
If the changes not reflecting then refresh the Magento cache and check.....
Magento: Setting Up Google Analytics + eCommerce Tracking
Google Analytics is a free Google
service which allows the webmasters and web site administrators to
monitor their web sites' traffic and conversion ratio.
Magento supports two types of tracking:
- Page View Tracking: Lists the origin from which your web store visitors linked to your store.
- E-commerce Tracking: Lists the customers that make purchases and what they buy.
First you need to sign up at http://www.google.com/analytics/sign_up.html. You will receive a Google Analytics account number. Write it down since you will need it for the Magento configuration.
Then configure the Google Analytics tracking in Magento. Open the Magento Admin area and navigate to System->Configuration->Sales->Google API.
Expand the Google Analytics section.

Pick the Yes option from the Enable drop-down menu. Enter the Google Analytics account number in the Account number field. Click on the Save Config button.
Note: Make sure you enable Ecommerce tracking in Google Analytics profile settings.
Tuesday 25 September 2012
Google Map based on address
Google Map based on address:
https://google-developers.appspot.com/maps/documentation/javascript/v2/examples/geocoding-simple
Google Developers:
https://developers.google.com/
Examples:
https://developers.google.com/maps/documentation/javascript/v2/examples/
https://developers.google.com/maps/documentation/javascript/examples/
https://google-developers.appspot.com/maps/documentation/javascript/v2/examples/geocoding-simple
Google Developers:
https://developers.google.com/
Examples:
https://developers.google.com/maps/documentation/javascript/v2/examples/
https://developers.google.com/maps/documentation/javascript/examples/
Monday 10 September 2012
Programmatically change Magento’s core config data
$configValue = Mage::getStoreConfig('sectionName/groupName/fieldName');
$testSwitch = new Mage_Core_Model_Config();
/*
*turns notice on
*/
$testSwitch ->saveConfig('design/head/demonotice', "1", 'default', 0);
/*
*turns notice off
*/
$testSwitch ->saveConfig('design/head/demonotice', "0", 'default', 0);
Well explained at http://inchoo.net/ecommerce/magento/how-to-programmatically-change-magentos-core-config-data/
Get the core config data collection that match the path and update new path:
try {
$path = 'old';
$collection = Mage::getModel('core/config_data')->getCollection()
->addFieldToFilter('path', array('like' => $path . '/%'));
if ($collection->count() > 0) {
foreach ($collection as $coreConfig) {
$oldPath = $coreConfig->getPath();
$newPath = str_replace("old", "new", $oldPath);
$coreConfig->setPath($newPath)->save();
}
}
} catch (Exception $e) {
Mage::log($e->getMessage(), Zend_Log::ERR);
}
Read more about Core Config data at http://alanstorm.com/magento_loading_config_variables
Friday 7 September 2012
Interview Questions
The 7 Interview Questions You Must Ask
http://www.cbsnews.com/8301-505125_162-51052952/the-7-interview-questions-you-must-ask/
Basic interview questions in PHP
http://www.website55.com/php-mysql/2009/12/php-interview-questions-1.html
http://www.a2zinterviews.com/Languages/php/index.php
http://www.scribd.com/doc/3904877/PHP-interview-questions-by-ajay1kumar1
Wednesday 5 September 2012
Steps to Install SSL on MAC OS X server with Apache webserver
You can find the detailed instructions on installing SSL at http://www.digicert.com/ssl-certificate-installation-mac-osx.htm [^] and pricing will be found at https://www.digicert.com/order/order-1.php [^]
While installing SSL there is no effect to our server setup however once the installation is completed we need to restart the webserver.
While installing SSL there is no effect to our server setup however once the installation is completed we need to restart the webserver.
Tuesday 4 September 2012
Get all customer groups in Magento
$customer_group = new Mage_Customer_Model_Group();$allGroups = $customer_group->getCollection()->toOptionHash();foreach($allGroups as $key=>$allGroup){ $customerGroup[$key]=array('value'=>$allGroup,'label'=>$allGroup);}return $customerGroup;Get all websites and stores in Magento
foreach (Mage::app()->getWebsites() as $website) {
    foreach ($website->getGroups() as $group) {
        $stores = $group->getStores();
        foreach ($stores as $store) {
            //$store is a store object
        }
    }
}
Add Custom Field in the Billing and Shipping Address of Onepage Checkout in Magento
How to Add Custom Field in the Billing and Shipping Address of Onepage Checkout in Magento
http://indiestechtips.wordpress.com/2011/07/30/how-to-add-custom-field-in-the-billing-and-shipping-address-of-onepage-checkout-in-magento/
Magento: Admin Grid Column types
There are many types of column types in the admin grid.

Following are the list of available types in Magento:

Following are the list of available types in Magento:
- date
- datetime
- number
- currency
- price
- country
- concat
- action
- options
- checkbox
- massaction
- radio
- input
- select
- text
- store
- wrapline
- theme
Monday 3 September 2012
Wednesday 22 August 2012
Change Rupee Currency Symbol In Magento
Open /lib/Zend/Locale/Data/root.xml file and look for
<symbol>Rs</symbol>
Replace with
<symbol><![CDATA[New Symbol For Rupee Goes Here]]></symbol>
Override the file.
Remove the Magento cache and refresh the product page.
You are done !!!!!!!!!!!!!!!!
<symbol>Rs</symbol>
Replace with
<symbol><![CDATA[New Symbol For Rupee Goes Here]]></symbol>
Override the file.
Remove the Magento cache and refresh the product page.
You are done !!!!!!!!!!!!!!!!
Tuesday 21 August 2012
Friday 17 August 2012
Programmatically create, apply and delete Shopping Cart Price Rule in Magento
http://inchoo.net/ecommerce/magento/programming-magento/programmatically-create-apply-and-delete-shopping-cart-price-rule-in-magento/
http://indiestechtips.wordpress.com/2012/02/17/create-shopping-cart-price-rules-programmatically-in-magento/
http://www.magentoworks.net/how-to-create-shopping-cart-price-rule-programmatically
http://mikebywaters.wordpress.com/2011/12/18/programmatically-create-shopping-cart-price-rules-with-conditions-and-actions/
http://stackoverflow.com/questions/2798069/creating-a-shopping-cart-price-rule-in-magento-automatically
Monday 13 August 2012
Steps to remove Malware
We need to follow below steps to resolve the Malware:
- Change the passwords for all the areas[cPanel, FTP, wp-admin]
- Download all the files and DB to your local system
- Find for Malware and remove them
- Re-upload the files to the server
- Submit to re-index the site in Google webmaster tools
Thursday 9 August 2012
Creating and activating USPS account
Please follow the below steps to create an account with USPS.
- Create an account at https://secure.shippingapis.com/registration/
- After successful account creation you will receive an email with following details:
- Username
- Password
- Email address / phone number to activate the account for live mode
- At this moment the USPS allow us to test the integration in Test mode only
- Now send an email / call to USPS (you will find this email address and phone number in step 2 above), to activate the account for live mode.
- Also request the USPS to activate below APIs for the account
- SignatureConfirmationV3 API
- Carrier Pickup™ APIs
- Shipping Labels APIs
- Price Calculators APIs
- Delivery Information APIs
- Address Information APIs
- Once the account is activated you will receive a confirmation email from USPS.
Friday 3 August 2012
Thursday 26 July 2012
Magento: Create customer and send welcome email programatically
try {
$customer = Mage::getModel("customer/customer");
$customer->website_id = 1;
$customer->store = 1;
$customer->entity_type_id = 1;
$customer->group_id = 1;
$customer->email = $data['email'];
$names = explode(" ", $data['name']);
$customer->firstname = $names[0];
if(count($names) > 1)
{
$customer->lastname = $names[1];
}
else
{
$customer->lastname = $names[0];
}
$customer->created_in = "Admin";
$customer->created_at =date('Y-m-d H:i:s', time());
$customer->updated_at =date('Y-m-d H:i:s', time());
$customer->save();
//$customer->welcome_email = 1;
if ($customer->getWebsiteId())
{
$storeId = $customer->getSendemailStoreId();
$customer->sendNewAccountEmail('registered', '', $storeId);
$newPassword = $customer->generatePassword();
$customer->changePassword($newPassword);
$customer->sendPasswordReminderEmail();
$customer->updated_at =date('Y-m-d H:i:s', time());
$customer->save();
}
$data['customer_id'] = $customer->getEntityId();
} catch (Exception $e){
echo $e->getMessage();
}
Wednesday 25 July 2012
Get Payflow Edition payment response details:
Extend the Payflowpro.php model app\code\local\Mage\Paypal\Model\Payflowpro.php
Add following line of code next to $this->_debug($debugData); in protected function _postRequest(Varien_Object $request) method Approx line number : 382
Mage::getSingleton('customer/session')->setPaymentResponseInfo($debugData); // Storing the results in a temporary session
Add the following code in Order success method in OnepageController.php
$order = Mage::getModel('sales/order')->load($lastOrderId);
$debugData = Mage::getSingleton('customer/session')->getPaymentResponseInfo();
if(is_array($debugData) and count($debugData) > 0)
{
$write = Mage::getSingleton('core/resource')->getConnection('core_write');
$queryString = "CREATE TABLE IF NOT EXISTS `payment_response` (`id` int(11) NOT NULL auto_increment, `order_id` varchar(50) NOT NULL, `avsaddr` varchar(50) NOT NULL, `avszip` varchar(50) NOT NULL, `cvv2match` varchar(50) NOT NULL, `response` text NOT NULL, PRIMARY KEY (`id`)) ENGINE=InnoDB DEFAULT CHARSET=latin1 AUTO_INCREMENT=1";
$write->query($queryString);
$order = Mage::getModel('sales/order')->load($lastOrderId);
$query = "INSERT INTO `payment_response` (`order_id`, `avsaddr`, `avszip`, `cvv2match`, `response`) VALUES ('".$lastOrderId."', '".$debugData['avsaddr']."', '".$debugData['avszip']."', '".$debugData['cvv2match']."', '".json_encode($debugData)."')";
$write->query($query);
Mage::getSingleton('customer/session')->setPaymentResponseInfo('');//Unset the session information
}
Do point 4 by extending OnepageController.php or Create an observer for order success and store the details into table
Add the following code to display payment response in app\design\adminhtml\default\default\template\sales\order\view\tab\info.phtml
if($_order->getEntityId())
{
$write = Mage::getSingleton('core/resource')->getConnection('core_write');
$queryString = "CREATE TABLE IF NOT EXISTS `payment_response` (`id` int(11) NOT NULL auto_increment, `order_id` varchar(50) NOT NULL, `avsaddr` varchar(50) NOT NULL, `avszip` varchar(50) NOT NULL, `cvv2match` varchar(50) NOT NULL, `response` text NOT NULL, PRIMARY KEY (`id`)) ENGINE=InnoDB DEFAULT CHARSET=latin1 AUTO_INCREMENT=1";
$write->query($queryString);
$write = Mage::getSingleton('core/resource')->getConnection('core_write');
$query = "SELECT * FROM `payment_response` WHERE `order_id`=".$_order->getEntityId();
$value = $write->query($query);
$results = $value->fetchAll();
$payResponse = json_decode($results[0]['response']);
}
if(count($results) > 0):
<div><strong>Payment Response Information:</strong> </div>
<div>
CSC Match: echo $results[0]['cvv2match']; <br/>
AVS Zip Match: echo $results[0]['avszip']; <br/>
AVS Street Match: echo $results[0]['avsaddr'];<br/>
</div>
endif;
Magento: Very Useful Collection Functions
Magento: Very Useful Collection Functions
http://blog.chapagain.com.np/magento-collection-functions/
How to create a sandbox PayPal Payflow account
I've been working with PayPal PayFlow Pro a lot lately. But before I got the hang of it, I couldn't figure out how to create a sandbox account for Payflow.
As it goes, it's different than setting up a standard sandbox account. To set up a Payflow account for testing, you would walk through the sign up process as if you were signing up for a live Payflow account.
Once you get to the section in the sign up process where it is asking for the billing information, just cancel out of the process. This creates a test account for you at this point, which you can access by signing into PayPal Manager with the login and password that you created. The partner will be PayPal.
http://www.richardcastera.com/blog/how-to-create-a-sandbox-paypal-payflow-account
Magento: Delete Order Free Extensions
This is supported for all the versions and working fine. It supports deleting Orders, Invoices, Shipments and Credit memos related to the order.
http://www.magentocommerce.com/magento-connect/asperience-deleteorders.html
The following extension simply deletes the order:
http://www.magentocommerce.com/magento-connect/seamless-delete-order.html
http://www.magentocommerce.com/magento-connect/asperience-deleteorders.html
The following extension simply deletes the order:
http://www.magentocommerce.com/magento-connect/seamless-delete-order.html
Friday 13 July 2012
Magento: Regions list related by country
Function to get Regions list by Country:
 public function getRegionCollection()
    {
        if (!$this->_regionCollection) {
            $this->_regionCollection = Mage::getModel('directory/region')
                ->getResourceCollection()
                ->addCountryFilter($this->getAddress()->getCountryId())
                ->load();
        }
        return $this->_regionCollection;
    }
Adding More States and regions to the countries:http://www.sycha.com/magento-add-custom-state-province-region-country
Magento: Display countries dropdown in custom module add / edit screen
Add below piece of code to the form page in customer module admin section
$countries = Mage::getResourceModel('directory/country_collection')->loadData()->toOptionArray(false);
$fieldset->addField('country', 'select', array(
'label' => Mage::helper('core')->__('Country'),
'name' => 'country',
'values' => $countries,
));
Here 'country' is field name from your custom module
You are done!!!
Thursday 12 July 2012
Payment Gateways and Extensions for Indian Rupee Currency
EBS Payment Gateway India:
WebSite: http://ebs.in/
Downloads:https://support.ebs.in/app/index.php?/default_import/Knowledgebase/List/Index/9
Magento Extension:
https://support.ebs.in/app/index.php?/default_import/Knowledgebase/Article/View/366/0/magento-16-ebs-integration-kit-ver-25
CC Avenue:
WebSite: http://www.ccavenue.com/
Signup Link: https://mars.ccavenue.com/mer_
Sample Code: Available in merchant account
Magento Extension: http://bluezeal.in/ccavenue4magento/ccavenue-payment-module-for-magento
CC Avenue Integration Scripts:
http://opensourceprogrammer.
http://world.ccavenue.com/
Tuesday 10 July 2012
Magento: How to redirect to URL
$targetUrl = "http://www.google.com/";
Mage::app()->getFrontController()->getResponse()->setRedirect($targetUrl);
Mage::app()->getFrontController()->getResponse()->setRedirect($targetUrl);
Monday 9 July 2012
Magento: addAttributeToFilter and OR condition in Collection
// Add OR condition:
$collection->addAttributeToFilter(array(
    array(
        'attribute' => 'field_name',
        'in'        => array(1, 2, 3),
        ),
    array(
        'attribute' => 'date_field',
        'from'      => '2000-09-10',
        ),
    ));
Defined at Magento Wiki...
Friday 6 July 2012
Wednesday 4 July 2012
Friday 29 June 2012
Magento: Show Optgroup in select box
Here Furniture is OptGroup. Copy and paste in any PHTML file and check the output.
$options = array(0=>array('label' => 'Furniture', 'value' => array ( 0 => array ( 'label' => 'Chair', 'value' => 1 ), 1 => array ( 'label' => 'Couch', 'value' => 2 ) ) ) );$tmp = Mage::app()->getLayout()->createBlock('core/html_select') ->setName('product_id') ->setId('product_id') ->setTitle('products') ->setClass('validate-select');$select = $tmp->setOptions($options);echo $select->getHtml();
Subscribe to:
Posts (Atom)